‘Adobe Flex’ a very good tool for developing RIA(Rich Internet Application)s. It provides plenty of components to display the data in variety of formats eg: DataGrid, Tree, List,… Also provides very good features to access the data from server.
Flex basically provides 3 ways HttpService, WebService, RemoteObject to access data from server. Where the earlier 2(HttpService and WebService) do not need any settings at server side or any change in compilation process of Flex code. All you just need to do is to provide the values for url or destination attributes of respective service tags in mxml. But the third way needs some work to be done at server side also some changes in compilation process of Flex code. Now in this post we will discuss about the third way of accessing the data from server i.e. The Remote Procedure Call(RPC) using RemoteObject tag in Flex.
Remote Procedure Call can be done by using “RemoteObject” a simple tag in flex. But with this tag we can not directly access the data or methods existing at backend. Flex do not provide this type of access, we need some other or third party tools for or procedure for making this Remote Procedure Call work. Selection of these tools depend on the program language or frame work in which the data accessing methods are written. If you are using .Net you are likely to go for WebORB for .Net. If you are using PHP you have tools like AMFPHP, WebORB for PHP. Now we will continue this post by considering JAVA as the programming language used for the Remote Methods, then we have options WebORB for JAVA, BlazeDs. As Adobe labs suggests also owns BlazeDs for J2EE servers, we will continue this tutorial with BlazeDs.
We will continue this tutorial by doing a simple example in parallel. Before that open the following link
http://opensource.adobe.com/wiki/display/blazeds/BlazeDS/ to get more details about BlazeDS. And download the binary distribution(about 4.5MB) from the following link.
http://opensource.adobe.com/wiki/display/blazeds/Release+Builds
Do not get confused with the source link for download. In the time it gets downloaded we will make the java objects ready for making a simple sample application.
We will write a simple class HelloRPC in Java.
/* HelloRPC.java*/
public class HelloRPC{
public String firstCall(){
return “Hello RPC for Java”;
}
}
/*End of class*/
Compile the java file and keep the class file. By now the file might have got downloaded. That’s a zip file. Extract this zip file into a folder. You have a war file(Caution: For better reusability keep a copy of this file into another folder). Rename this war file with the desired name for the application. Lets say we changed this to firstrpceg.war. Now deploy this file onto the J2EE server. As this war file is readily made to be deployed in tomcat server, lets deploy it on to the Tomcat(5.5 or above) server.
After deploying the application on to server, we will get a folder in the webapps folder of the server installed folder with the name of the war file we have given. Enter the folder copy the class file we got by compiling the java file we just wrote into the WEB-INF -> classes folder. And move to the WEB-INF folder you have a folder with the name flex. Move to that folder, you can observer the xml files which are the descriptors of the RemoteObject settings. Open the remote-config.xml file with any editor. Now just describe a simple destination here. You can do this by entering the following code at the end of the services tag.
<destination id=“remoteObj”>
<properties>
<source>HelloRPC</source>
</properties>
</destination>
That’s it for the server side settings. Now we will set the compilation options of the Flex project. We will start this by beginning a new project in flex using Flex Builder.
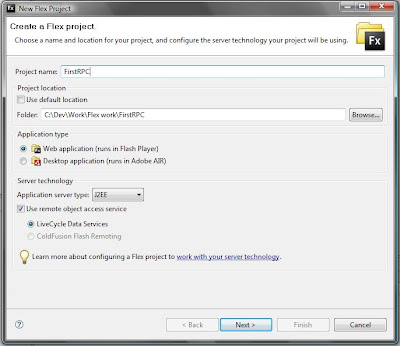
Open Flex Builder. Go to File -> New -> FlexProject. Specify every thing needed, finally select the server type as J2EE in the flex project creating wizard.

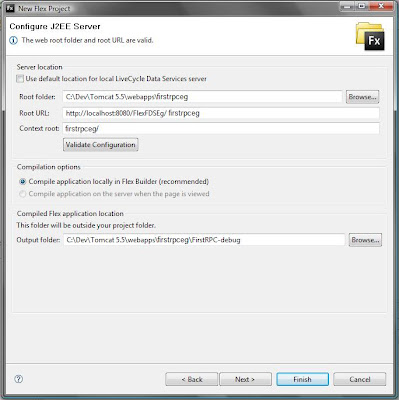
Now click on next. Specify the address of the folder just created in the webapps folder of server by deploying the war file. Also the URL, in our example it would be http://localhost:8080/firstrpceg. Finally the context, typically the context name would be the name of the application i.e. firstrpceg. Now click on validate settings button. Before clicking on this button make sure that the tomcat server is started.

Click on finish button if your validation for the settings has given successful result. In the mxml application file just paste the following Flex code between the application opening and closing tags.
<mx:RemoteObject id=“RPCforJava” destination = “remoteObj” result=“handleResult(event)” fault=“handleFault(event)” >
<mx:Method name=“firstCall”>
</mx:RemoteObject>
<mx:Label id=“resultLbl” />
<mx:Button label=“click” click=“RPCforJava.firstCall()”
<mx:Script>
<![[CDATA
private function handleResult(event:ResultEvent){
resultLbl.text = RPCforJava.firstCall.lastResult;
}
private function handleFault(event:FaultEvent){
}
]]>
</mx:Script>
Now directly run this application file from the flex builder(caution: keep the server on). If you click on the button “click” you will get the result “Hello RPC for Java” as the text for the label.
In the above Flex code, the value specified for the destination attribute of the RemoteObject tag typically should be the id of the destination tag specified in the remote-config.xml. The name of the Method tag should match the name of the method in the java class we wrote earlier. That’s it we have a simple sample application for using the RemoteObject in flex for accessing the java objects using the blazeDS tool. We will discuss about settings in detailed in my next post.

